Pages

Ombre Rocket "Shoot for the Stars" Wall Art Tutorial ~ Silhouette Cameo

Monday, February 29, 2016

One Rockin Mamma
Split board tutorial
Using Silhouette Cameo cutting machine 
Ombre' Rocket "Shoot for the Stars" Wall Art 
Inspired by: Target, Pillowfort Astro Adventure Collection


Paint Colors Used –

Lightest - Mint Whisper
 Medium - Meadow Mist
Darkest - Simply Seafoam 

Dark Blue – Shaded Lake
Yellow – Golden Flame 

Vinyl is Oracal 651 Metallic silver

The craft boards I am using are 12 x 6 and two 12 x 4.

Paint your boards in the Ombre' colors 1st and set aside for later.

Open your Silhouette Studio Software. 

The space ship design is named “rocket”. I got it from the Silhouette Store. A quick search should pull it up! 

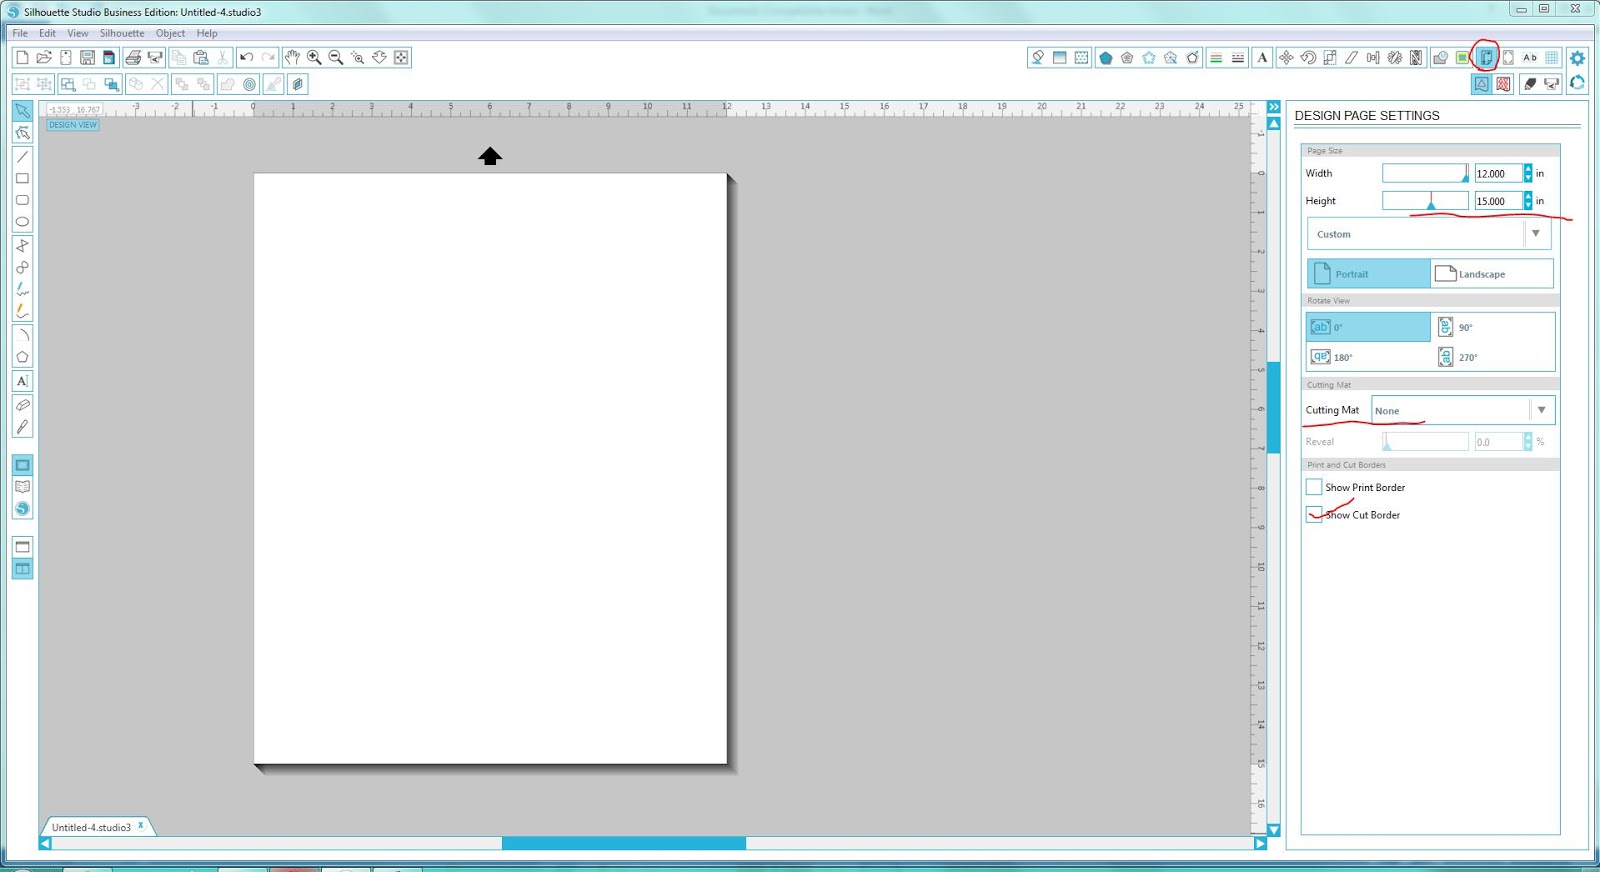
Set your design page to about an inch longer than your boards combined length.
Total my boards equaled 12 x 14 so I set my page settings to 12 x 15. Make sure to select show cut border.


In order to get everything sized JUST right, I drew my board sizes in rectangles and spaced them evenly on my page. It helps me to visualize what things will look like. So go ahead and color them in as well! I circled the tools you need to use to get them spaced evenly.
SELECT ALL 3 rectangles -
First- ALIGN CENTER
Second- SPACE VERTICALLY 


Now, open your space ship file onto this page. Size it however large you want it. 


Ungroup your space ship. Color in the flame part. 
Now select all of the space ship portion, and right click. Select MAKE COMPOUND PATH. Now when you color this in the voids will be there for the windows. Color the rocket in after this step. 


Here comes the fun part! We are going to make the slices that will make the space between each board proportional and look just right! 

Zoom into your design, I am working my way from the bottom up. 
Select your KNIFE tool ( on the left, circled) .
Make sure your Knife is set to SOLID before you begin( on the right and circled) 
Start where I have a circle and number one.
Click and HOLD DOWN your SHIFT key. This will ensure your slice is straight.  Once you click on the spot I have labeled 2, your slice will be made! 


Repeat this step for the line below. 


Once you have both lines completed, delete the area that is in-between the two lines. 


That was easy, eh? Repeat those steps for the two above voids as well. Once finished, your page should look like this! 


Now we are getting somewhere! 

If you are planning on just putting vinyl over your painted board and calling it a day, go for it! Everything should like up really nicely. 

I on the other hand want to paint these areas instead. I think it looks better over a large area instead of vinyl. 

Lets make the stencil. I am using Oracal 651 in a color I have tons of. You can use whatever stencil material you prefer. 

Group things according to color. This will help keep things just right and move around easier. Also, set aside your Ombre background. You don't need it for this part. 

Select your whole rocket. Use your OFFSET tool to make a large outline around the whole rocket. My offset ended up being around 1.3 inches. 


Once you apply the offset, it should look like this. 


Select the WHOLE rocket, outline and all. Right click and MAKE COMPOUND PATH. 


This makes your rocket one object. Go to your color tools and fill in the design black. Now, do you see your stencil? 


Let's trim those overlapping areas. I'll teach you a little trick while we are at it! 

Draw a rectangle just a smidgen inside the red cut border lines already on your page. I go so close that you can barely see them. I went ahead and made mine yellow, just for visual purposes. You don't need to do this. 


Select the rectangle AND the whole rocket. 


Go up to your MODIFY tools at the top of your page ( circled)
Select CROP. 


TADAHHHH!!! 
Super easy, right? 

Send the design to your cutting machine. 

Once it is cut out, weed it to look just like this. 


Grab your transfer paper and lay it over your whole design. Smooth it over. Remove your stencil from the carrier page and lay it UPSIDE DOWN on a flat surface. I want the sticky part of the sheet UP. 

Grab your boards.

While your stencil is laying upside down, on a flat surface, place your boards RIGHT SIDE DOWN in the appropriate areas. This method is WAYYYY easier than trying to place the stencil over the boards. 


Now press your boards down to make sure they are stuck on there. Flip everything over carefully. Use your scraper to press down the vinyl onto your wood. Just like you would be transferring any other vinyl to a surface. 


Grab an exacto knife, and cut in-between each void. 


Now, use your scraper again and make sure all areas are over the boards smoothly. Remove the transfer paper carefully. 


Now grab your Exacto knife again, and trim the areas that are overlapping the middle parts. Just a little nip should get them off easily. 


Your stencil should look as follows. 


Take a few minutes to really rub in the vinyl edges. This will ensure that you have smooth lines and no paint will bleed. 

Time to paint! 

At the last minute I decided to do my rocket a dark blue instead of white. So, in all the areas of the tutorial that I was describing white, paint those blue. Then paint the flames yellow. 


Let this dry, then do it again.

After the second coat is dry CAREFULLY peel up your vinyl.

This is what I got! My lines are not perfect, but they are good enough for me! 


Now lets attach these boards together. I am cheating and using large Popsicle sticks and hot glue! This is for my Sons room, we don't need fancy! If I were to sell these, I would use some custom cut wood pieces sized to the back and wood glue.  


Now onto the lettering. You surely can choose whatever you would like for this part. If you like my "Shoot for the stars" design, download it here. The design is in .Studio2 format. Go ahead and cut out your design, and apply your transfer paper. 


Carefully cut along the lines in-between the words. I promise this will help when applying your vinyl. Don't skip this step! 


Now trim it again in the areas pictured below. 


Apply the vinyl IN ORDER of my directions. This is the easiest way to get everything just right! The areas you trimmed should line up just right with your boards and the voids. 


DONE! I love how this turned out. 

 I hope you have found this tutorial helpful! If you recreate this design, PLEASE share with me your results or any issues you may have had. I could have missed a step or two and not realized it.

As always, thanks for taking a look. Have fun and craft on!

Original design setup by Ashley Duhon, One Rockin Mamma. 
All photos are Property of One Rockin Mamma. You may not use my photos. 
"Shoot for the Stars" may not be sold without permissions. Please contact Ashley@onerockinmamma.com with any further questions. 

Love you to the moon and back, Doctor Who version ~ Silhouette Cameo

Sunday, February 28, 2016

Here is a tutorial on how I made this "I love you to the moon and back" Doctor Who version. I am using Silhouette Studio software, and a Silhouette Cameo cutting machine.


I used 12x12 craft boards for this piece. They are thin, easy to work with, and easily are hung on any surface with Command Strips! 


The paint colors I used are as follows
All purchased from Lowes in Val-spar brand
White – ULTRA WHITE
Grey - CITY STORM
Yellow – GOLDEN FLAME


The Vinyl I used for the Tardis (Brilliant Blue) and Text ( Black)  is Oracal 651.

The Tardis SVG I found online. I do not own rights to the file so I cannot share it. A Google search should pull one up for you!  

Font is Aintzane Script

Let's Get started! 

First, I painted the craft boards my background color. Let that dry fully before using a stencil.  

While that was drying, I went in to my Silhouette Studio software and started designing! I am going to walk you through my whole process, hopefully you pick up a trick or two along the way. 

Lets work on the "Love you to the Moon" board first. 

I used a design set  from the Silhouette Store called " Alien Planet Set" for the moon and stars. 

Here it is, I like to color in my designs while I am working. It helps me get a better grasp of how my end result will look. Right click on the set, UNGROUP the design, then color them in. 


So as you can see, we will not need that swirly thing. Go ahead and delete it. 

Now you are going to set your stars aside and we are going to make our moon. Did you notice when you colored it in, it looked a little weird? Lets fix that! Select all of the moon, right click and MAKE COMPOUND PATH. 


Grab your moon, rotate it, and size it up to achieve your desired look. The green circle that appears above your selected object allows you to ROTATE a design. The little squares that pop up in each corner allow you to adjust your size. 


Here is what I ended up with! 


To get your moon cut in half, follow along. 

Select your slice tool. See the three RED areas I have circled? Make sure that option is selected before you start. Now, HOLD DOWN SELECT while using your slice tool. This will ensure you get an exact straight line. I went a little below my page line, just so the stencil will overlap.  After you make your slice, delete the bottom half of the moon. 


Next we are going to curve our text for the "love you to the" part. 

First, draw a circle that is the same size as your moon. Remember to hold down select while drawing it to achieve a perfect circle. 


Select your text tool and type out " Love you to the "

The font I used is called Aintzane Script
If you want a cute free font, try Janda Stylish Script


Like I mentioned earlier, I always color in my designs as I go along. Color in your font if you choose and size it up to the size you like. 


Now we are going to curve the text. Grab that circle we drew, and bring it up to the area you want your text to be. 


Double click on your text until you see the green box around it. 

Do you see this little arrow thing circled below, select that, and drag it over your circle.


You will have to move it around just a little bit to get it centered. If you look at what I have circled below, you will see two options. The option all the way on the left that goes up and down give you the option to slide you text above or below the object you are trying to wrap it around. I liked how it looked as is, so I didn’t mess with it.


Now, I don’t know if you noticed, but some of the letters separated a little too much once they were curved. To fix that you need highlight your text and to take the “Character Spacing” (Circled in red) down just a tad. I took it down just enough to where most of my letters were overlapping again. Also, if you want your text bigger or smaller, now is the time to adjust it.


While I was adjusting everything, I noticed my words ended up a little too close together. So, I went in and added an extra space between each word and between the L and ove in Love. I think this made it much better.


 Next, select your text.
UN-GROUP your text.  Delete that circle we used to curve the text. You will not need it again.


Now, select one word at a time, and WELD (Circled in red at the top). 

I also like to “group” each word if it doesn’t weld all together. Do this for each word. Welding makes your objects cut as one solid word. If you skip this step in a cursive font, you will end up with each letter cut out individually. DO NOT skip this step. After you weld each word, group the whole phrase.

Next use your text tool again and type out “Moon”. Ungroup it, and weld it just like you did above. Size it to your liking in the moon.

Next, open your Tardis file. Like I mentioned earlier, I didn’t design the file so I cannot share it. A google search of “ Tardis SVG” should pull one up for you!  Fill it in blue and bring it into this page. Mine is sized right at 3.2 x 1.7.


Now select everything you have ON your page. ALL of it! Click on your align tools that I have circled in red, and ALIGN CENTER them all. This just makes sure all your objects will be centered nicely on your page.


 After I got my Tardis on the page, I moved things around a little bit. You can move things around to your liking but make sure to keep things centered. Repeat the centering step often. 


Now on to your stars. Select all of them, right click, and Duplicate the whole set. Place them wherever you want to your liking around the design space. Delete any extras you don’t use. Voila! Done designing! Now onto the fun stuff.


Select and GROUP the moon and stars. You don’t have to do this, but keeping things grouped helps them not get knocked around accidentally.

Select the phrase and Tardis and move them off to the side of the design space. We will use those later. 
  
Time to make your stencil!

Since the board I am using is 12x12 I went ahead and altered my Design Space settings and told it I was cutting a sheet that is 12x14. Having the overlapping helps when transferring the stencil. I also went ahead and selected “None” for my cutting mat so I could cut larger than 12x12.  
Showing your cut border will help you keep everything in the cut space. Go ahead and select that as well. (I have it checked and circled in red)


Load a sheet of your stencil material (I used Oracal 651, you can use contact paper, or whatever stencil material you prefer) on to your machine and cut it. Yes, you are cutting the moon and stars all at once.
   
After it is cut, weed your design as follows. Remember we are using this as a stencil, so we are KEEPING the background and weeding the stars and moon.

 You will notice the whole moon didn’t cut on the bottom corners. I used an Exacto knife to complete the cut on the edges.


 Unfortunately I do not have pics of how I continued the process. I decided to make this tutorial AFTER I got a huge response from posting the pictures. I didn’t have any more boards at home so I decided to just guide you through the rest. I am using the back of the boards I already made to show you a few parts.

This step is up to you how you choose to continue. More experienced folks may choose to just peel the stencil off and place it carefully over your craft board. The bottom of the stencil/ moon WILL come off. It’s ok, you don’t need it. You will have to manually place the inside of the moon craters. That is how I did it.

If you are not as experienced in this area, you might want to use some transfer paper to transfer the design. PAPER transfer material is ideal here. I know it’s a little harder to work with, because it is not clear, but it is easier to transfer the stencil with it.

You can always use a little bit of painters or masking tape to overlap your edges if you need.


After you have your stencil transferred, RUB RUB RUB into the edges of each shape. You want the vinyl or whatever stencil material you used to really stick to the board. If you leave any areas not properly stenciled, your paint will bleed and look sloppy.

Now, paint your stars yellow, and moon grey! Let it dry, and do another layer. When that is dry remove your stencil slowly and carefully.

Go back to your Software and cut out the Tardis and Text. Apply it to your board and you are DONE! If you wanted to create a stencil and paint these, you could use the same process. I liked the look of vinyl and paint stenciling mixed.

For the “and back” board you will be using the SAME EXACT process as before!

The houses scene I purchased from the Silhouette Store and the design name is “Christmas House Border”

I won’t be walking you through all those steps, but here is a pic of how it looks in my software.


 I hope you have found this tutorial helpful! If you recreate this design, PLEASE share with me your results or any issues you may have had. I could have missed a step or two and not realized it.

As always, thanks for taking a look and have fun and craft on!

Original design by Ashley Duhon, One Rockin Mamma. 
All photos are Property of One Rockin Mamma. You may not use my photos. 


Powered by Blogger · Designed by Pish and Posh Designs